Contents
Index
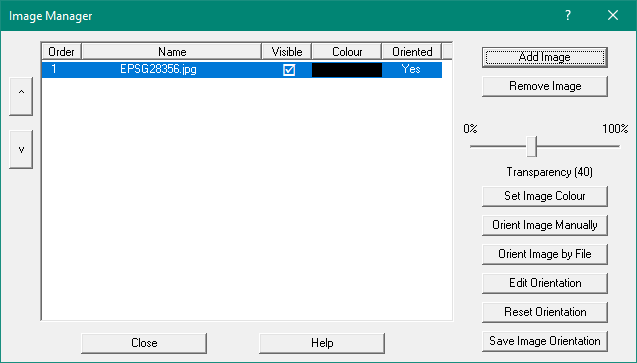
Image Manager
This dialog allows you to load images, manage the display order,
set the image colour (for black and white images) and unload images.
The image file can be used to provide a backdrop for the job. It is usually an aerial photo of the job.
There is an option on the zoom menu to allow the background image and the job to be ‘aligned’ so that the image
overlays the job correctly.
The image option can also be used to load a Title plan as the backdrop and will allow you to digitise
irregular boundaries (creeks) into the job.
Use The Edit/Image Manager menu option to display the Image Manager.
Add Image
This button will prompt for an image file and will load it into the image display list.
It can be a .jpg, .gif, .png, .tif or .tiff file.
NOTE:
the image will be loaded at 1:1 ratio. For a scanned image of a plan, you may only see the bottom
left corner of the plan. You can zoom and pan the image independent of the job using these keys:
- Zoom Out = Alt, - (Keypad Minus key)
- Zoom In = Alt, + (Keypad Plus key)
- Pan Down = Alt, Down Arrow Key
- Pan Up = Alt, Up Arrow Key
- Pan Left = Alt, Left Arrow Key
- Pan Right = Alt, Right Arrow Key
Remove Image
This button will remove the selected image from the image list (unload it).
Transparency
The slider displays and changes the selected image.
Move towards 100% to make the image more transparent so you can see the images 'underneath'.
Set Image Colour
Click on the colour bar on the image list or click on the 'Set Colour' button to select the colour for an image.
This can only be done for 'black and white' images.
This is useful if you have two or more Plan images on screen, set one to Red and one to Blue
to make it easy to distinguish them.
Orient Image Manually
This is used to 'align' the image features with your job.
This is done by clicking on image points and their corresponding job point.
This allows GeoSurvey to compute an Affine transform to fit the image to the job.
See Orient Image Manually for details
Orient Image by File
This option can read the image orientation parameters from a Georeference file.
GeoSurvey uses an ESRI compatible Georefencing File format, see bottom of this page for details.
Note that when you use 'Add Image', it will automatically look for a .JGW (or similar)
file in the same folder as the image, and will automatically orient the image using this info
You can do this by selecting the JGW file yourself.
Note that the convention for the transform files for a .JPG file it is a .JGW file.
- For .JPG image file, transform is a .JGW file
- For .TIF image file, transform is a .TFW file
- For .TIFF image file, transform is a .TFW file
- For .PNG image file, transform is a .PGW file
- For .GIF image file, transform is a .GFW file
Edit Orientation
This option displays the trasnform used for the selected image
You can edit the parameters if you wish.
BEWARE Take extreme care when editing these values.
Reset Orientation
This will erase orientation/Transform data for the selected image
Save Image Orientation
This option will write the image orientation for the selected image to an ESRI compatible Georeferencing file.
See the bottom of this topic for more info.
Display Order
Select an image in the list and press the ^ v keys on the left side to move the image up or down the display order.
Image are displayed from top to bottom, so the last image will appear 'on top'.
If you cannot see an image 'underneath' another one, you can change the transparency value of the top image so
you can see the one underneath.
Turn Image On/Off
Click on the tick box in the 'Visible' column in the image list to turn that image display on or off.

ESRI Georeferencing File
The Gerref file usually has the same name as the image file and is in the same folder.
Thus if the image file is 'C:\data\test\1117750_small.jpg', the georeferencing file will be
'C:\data\test\1117750_small.jgw'.
The contents of the world file will look similar to this:
20.17541308822119
0.00000000000000
0.00000000000000
-20.17541308822119
424178.11472601280548
4313415.90726399607956
File Contents
- Line 1 - X scale
- Line 2 - Sin (rotation)
- Line 3 - Cos (rotation)
- Line 4 - Y scale
- Line 5 - X Offset
- Line 6 - Y Offset